STAGING TIPS FOR SELLING (OR JUST SIMPLIFYING!) YOUR HOUSE
How should I stage my house to sell? Should I take down all of my family photos? I’m not selling but I want my house to look good for company- give me some tips! Do I need to add a lot of decorative accessories? Or, wait am I supposed to be taking things away and decluttering?!
These sentences (and about 642 more) have all been slung at me every time I mentioned that I’ve been working on the side as a home stager for a local realtor for over a year. If you haven’t heard about that you can catch up – and get a few bonus stories and tips – by listening to podcast Episode #53, Episode 41, and Episode 88. But in this extra-beefy post (gah, it’s almost 5,000 words!) I’ll cover why I love staging, my favorite money-saving tricks, and I’ll share some before & afters of a few of the homes I’ve helped get ready for sale. Can you tell I love this topic?
WHY STAGE A HOUSE?
To me, the goal of staging is to leave each room feeling as open, light-filled, and welcoming as possible. Unlike everyday decorating, you’re not trying to show off your style or the decor – you’re trying to show off the actual house itself. So you never want to overfill a space and detract from features like hardwood floors, large windows, light filled nooks, built-in storage, or any of the other things that come with the house. Got a room that’s small and dark and boasts none of those features? Whelp, I can see why you might be tempted to fill it with stuff to hide that fact… but DON’T! That’ll just make it feel more cramped & cluttered! Any accessories or furnishings should really just help buyers imagine how they might live there – so my entire staging mantra is K.I.S.S (keep it simple, stager).
I personally LOVE the challenge and instant gratification of staging a house. In a few hours, a home can completely transform (for very little money – and sometimes none!). Some stagers bring a giant truck full of furniture, rugs, etc – but I don’t do that type of staging. I am hired through a local realtor for homes with homeowners who typically have a lot of stuff but just need some help editing, refining, and adding some extra style – so that homeowner can sell their house faster and hopefully for more money.
And staging works! I hate to jinx myself by even saying this out loud, but none of the houses I’ve ever staged have sat on the market for more than three days (one even sold within 12 hours for over asking price!). So as awkward as it feels to toot my own horn, hopefully sharing my “record” can help to establish that staging can definitely make a giant difference when it comes to getting more buyers in the door, more offers on the house, and maybe even a higher sale price in the end.
THE STAGING PROCESS
My approach to staging is largely about removing unnecessary items, like large furniture that crowds a room or general clutter that makes a home feel chaotic. These are simple edits any homeowner can make before they put their house on the market (or just anytime, to enjoy a more peaceful feeling at home). Seriously, it’s so amazing to see what a difference it can make in other people’s houses that I often come home and do the same thing to our rooms – even though we have no plans to sell this house for at least a few decades (and maybe never – ha!).
I don’t bring much to the homes I stage, just a large bag or two of accessories to add polish to areas that I’ve simplified or decluttered. You know, things like: art, vases, bedding, pillows, and other small items like a white ceramic soap pump. Because, again, the bulk of what I do is just to work with what the homeowner already has. I’ll further explain that – and share photos of some of the items I bring – later in this post, but in most cases I’d describe the process as 3% addition (of a few new decorative items) and 97% subtraction (of things already in the house that are crowding the home and hiding its true potential).
Where does all the subtracted stuff go? Well, the realtor and the homeowner typically predetermine an area for me to put the large items that I remove (like an overstuffed chair that’s crowding a living area or a bench at the foot of the bed that’s making a small bedroom feel smaller). Those predetermined areas might be a garage, a storage pod outside, or the attic. For smaller clutter I might remove, they often they leave out a few empty Tupperware bins or a large laundry basket or two so I can walk from room to room and fill them with little stuff that doesn’t need to be out on display (later they can tuck those items into drawers or cabinets if they need them to stay in that room – or put them in the attic if they don’t).
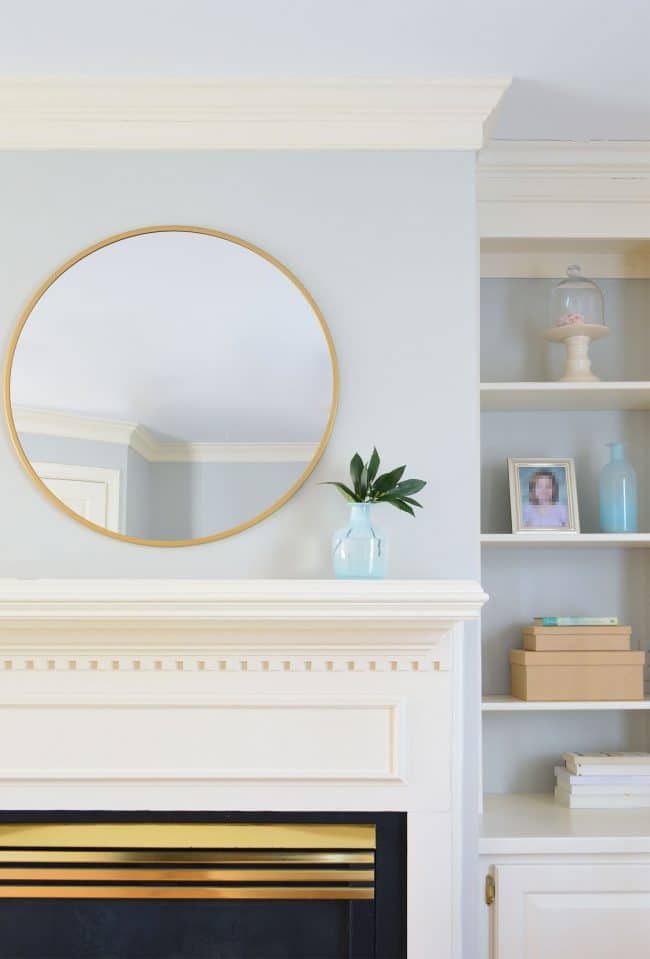
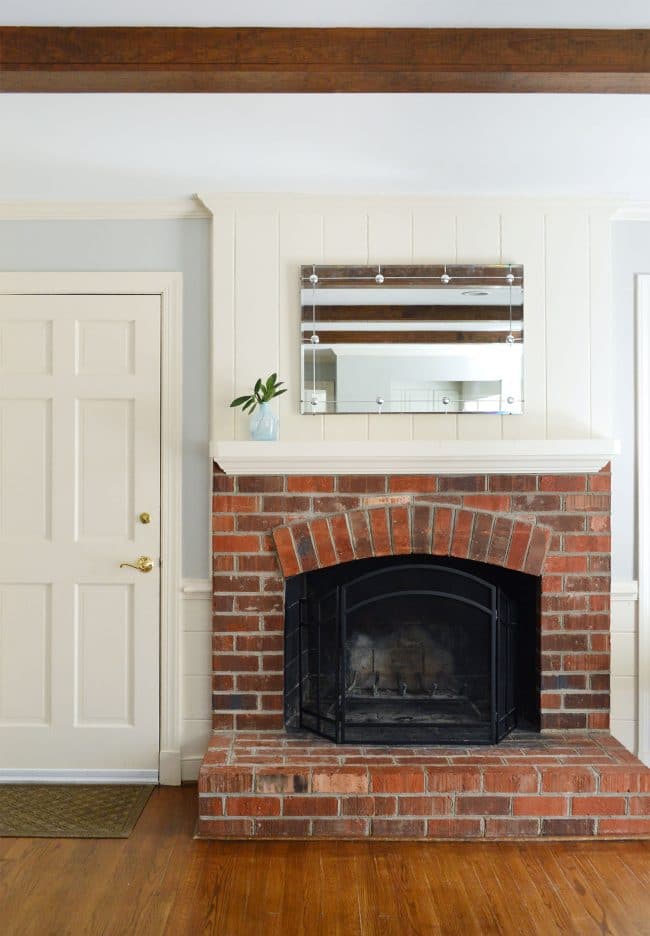
People don’t hire me for my big strong moving muscles, they just need someone to EDIT RUTHLESSLY for them – being firm and decisive about what stays and what goes. Simplifying mantels, shelves, tabletops, and all of the other surfaces that we can become blind to over time – so we don’t notice how busy they feel until someone comes in and gives them a hard reset. For example, these bookshelves and this mantel had about 50% more things on them before I simplified them and got them ready for the listing photos.
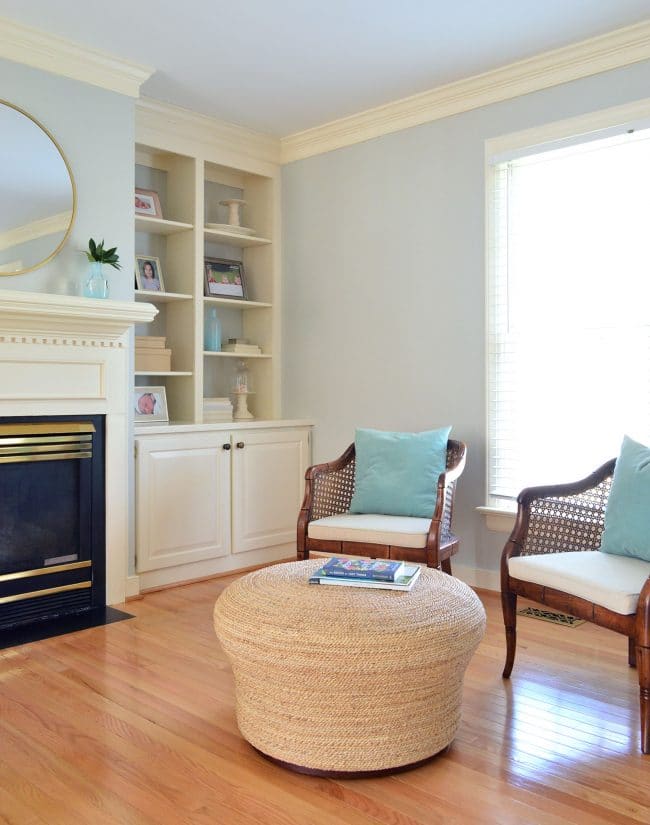
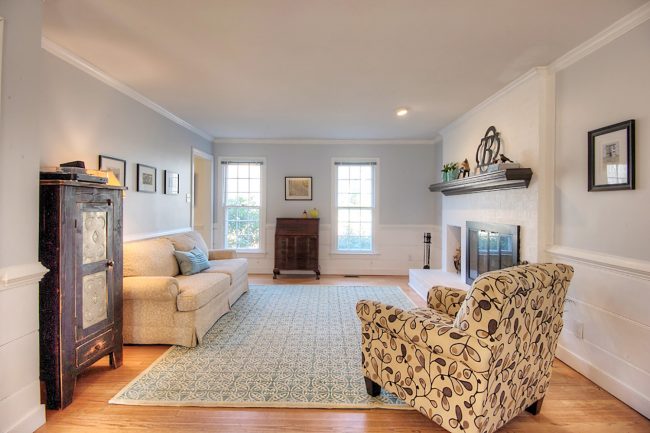
The photo above is from someone’s master bedroom. I don’t have a before photo for you, but let me paint you a picture: GIANT BLACK ELLIPTICAL MACHINE sitting on those lovely hardwood floors, partially blocking the fireplace and the built-ins. I helped them move it into their garage so we could stage it as proper seating area, using furniture they already had and some pillows I loaned them. Sure, we could’ve done more (like add a rug) but staging isn’t about making a room look “perfectly decorated,” it’s about painting a picture of life in that home. Plus, a rug would have hidden those shiny hardwood floors!
The point is, you want to enhance the fantasy of living in the house. Who wouldn’t want to picture themselves sipping coffee on a cold morning in their master bedroom’s sitting area with the sun shining in through the large windows and the fireplace on while gazing up at their pretty built-ins?! That sentence has like four selling features in it!
EASY STAGING TRICKS YOU CAN DO
I know you guys are looking for more detailed suggestions than just to “simplify and declutter” – so we’ll get to some before & after pictures in a second, but first I wanted to list a few easy things you can do right away (and many of them cost zero dollars!). These are usually things I do the second I get into a house that I’m staging – and it instantly makes entire rooms feel lighter and more spacious.
CLEAR COUNTERTOPS
In kitchens and bathrooms, remove almost everything. Clutter can make even the fanciest kitchens look bad, so stow away as much as you can – especially stacks of paper clutter or small appliances. Same rule for the bathrooms – hide those messy toothbrushes and makeup compacts. I often find that those countertop items can easily fit in the kitchen or vanity drawers, under the sink, or in the medicine cabinet – and if you like having them out for your day-to-day use, that’s completely understandable. But when you’re trying to sell your house, you don’t need people staring at your immersion blender and its long cord just junking up your kitchen counter. Or glancing at your q-tips and picturing you poking your ears with them in their future bathroom. Tucking all of that away can help people see all of that nice surface area for them to someday fill with their own stuff.
Here’s an example of a bathroom after I staged it. See how there’s nothing hygiene-related in sight?
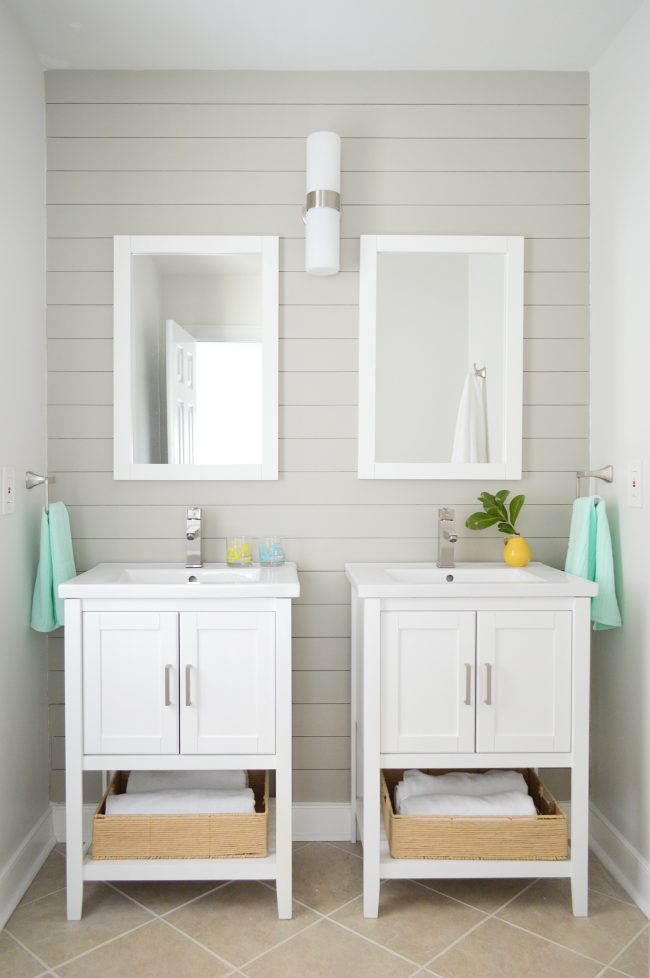
vanities (they’re the same ones we have in gray at our beach house!)
SIMPLIFY OTHER SURFACES
Find ways to clear off other household clutter-zones, like: kitchen tables, coffee tables, nightstands, and bookcases. Even I have to fight my instinct to “over style” sometimes – because in our everyday lives, seeing our stuff around makes us feel at home. But when you’re trying to make someone else feel like this house could become their home, you don’t want your junk stealing their attention at all. You want them to really absorb what makes the house so cool – not notice that you collect frogs or heart shaped rocks.
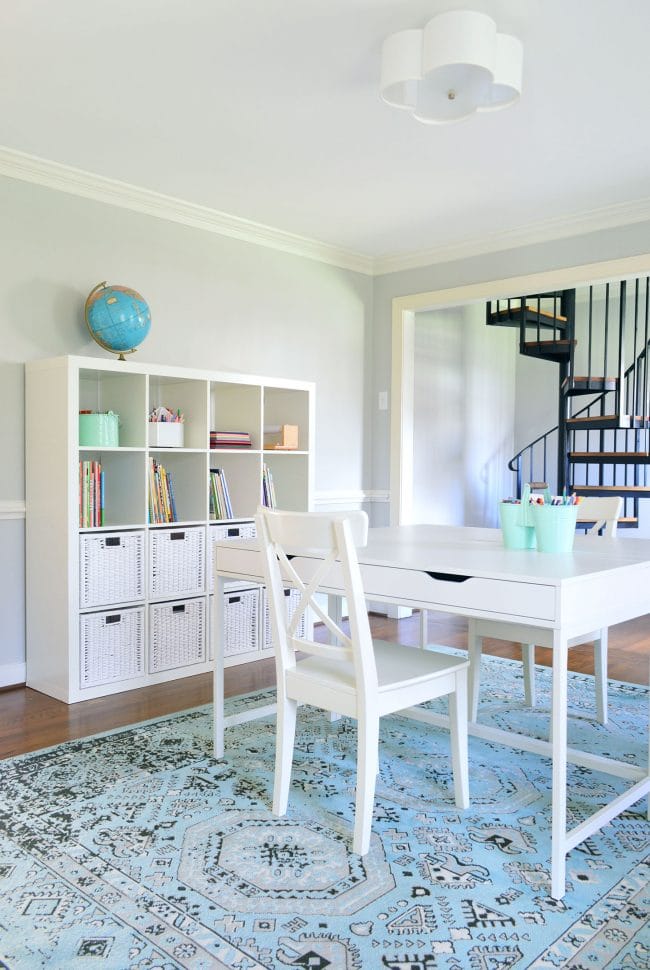
For example, here’s a kids’ homework room that I helped my friend create from an unused home office in her house last year (you can read more about that and see all the sources and before & after pics here). This is how it looked when it was all filled up and ready for everyday use:
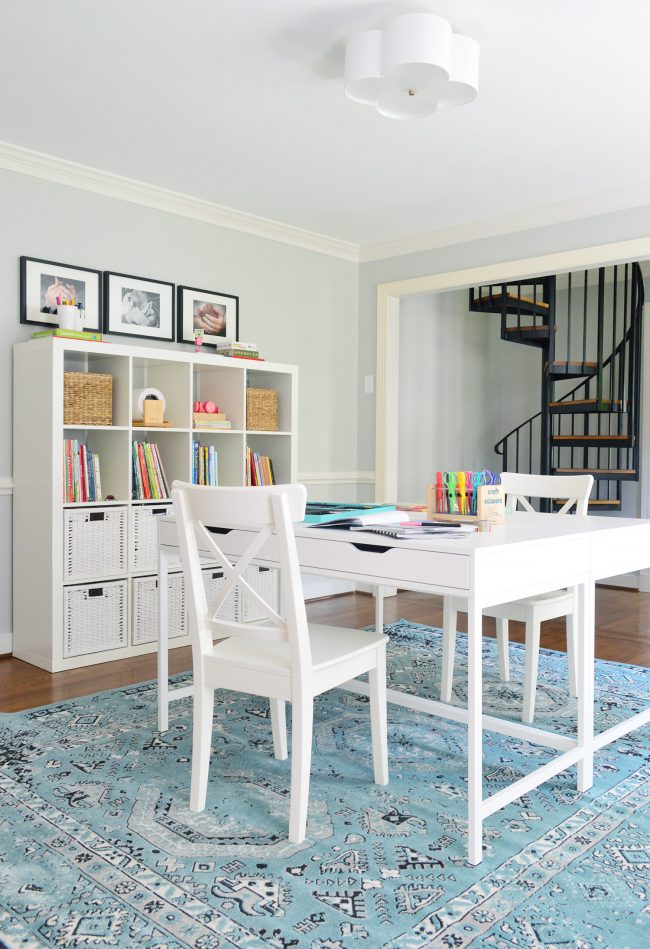
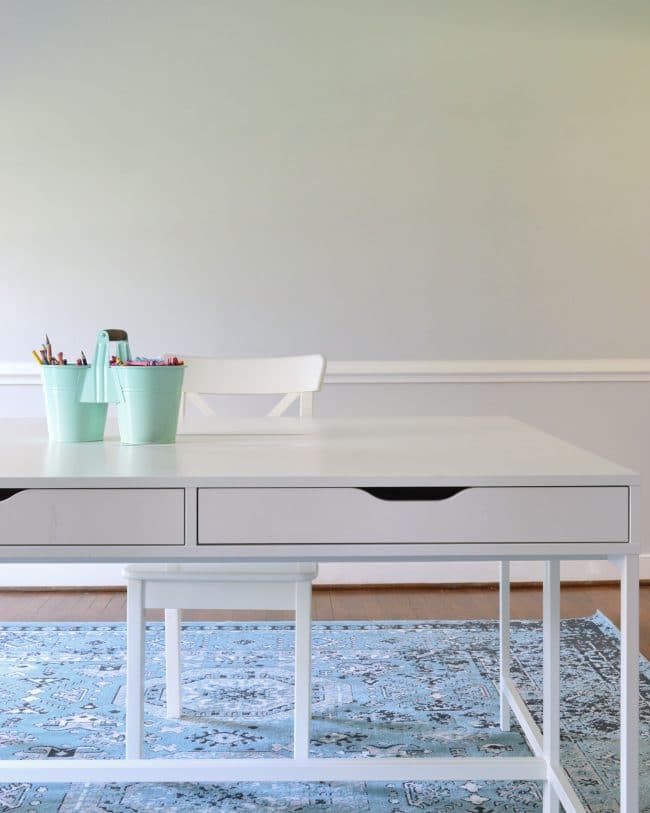
Now here’s the same room staged to sell. It’s not a huge difference, but the desk surface has been cleared off so your eyes don’t get caught up staring at all of their crafting supplies, and the top of the bookcase has a single globe that I brought over (the rest of the objects that were up there, along with the framed photos were removed). Even though it was a pretty simple change, scroll back and look at the photo above this one and then glance again at this picture. See how that super cool spiral staircase (hello selling feature!) jumps out a bit more in this photo?
REMOVE SMALL RUGS & UNNECESSARY FLOOR COVERINGS
Floors are big in staging – people want to see the material, and they want the house to feel like it has good flow. So the less interrupted they are with doormats, runners, or other small rugs, the larger a space will look. Think about how smooth and fluid it would feel if your eyes were following a nice long hallway that led to a bathroom at the end of it. Now imagine there’s a small area rug in the hall and then your eyes bounce from that rug, back to the floor, and then onto a fluffy little rug in the bathroom. Your gaze is feeling a lot more interrupted than if you had just removed those smaller rugs & bath mats before snapping the listing photos or hosting any walk-throughs.

So yes, you probably use a bath mat every day, but for listing photos (and walk-throughs!) I strongly recommend folding it up and storing it wherever you stash your extra towels. Same with small hallway runners and mats in front of the kitchen sink. That’s not to say you should eliminate all of the rugs in the house (please don’t!) because a large area rug that fills a living room, bedroom, or dining room can help the space feel expansive. It’s just those small dinky rugs – especially the bath mat! – that people don’t need to see (or walk all over in their dirty shoes during a showing).
LET WALLS BREATHE
One regret we have in selling our second house is that we didn’t simplify the frame gallery in our hallway. It didn’t stop the sale, but I’ll never forget the look on the buyer’s face when they imagined all the nail holes that would need to be spackled (which of course we did for them before we left). But the point is, don’t let the things on your walls distract from the size or flow of the space. All walls don’t need to be blank (I love a well placed large mirror or framed painting) but if the walls feel even slightly busy, I’d err on the side of taking things down. Remember, you’re selling the space, not the decor.
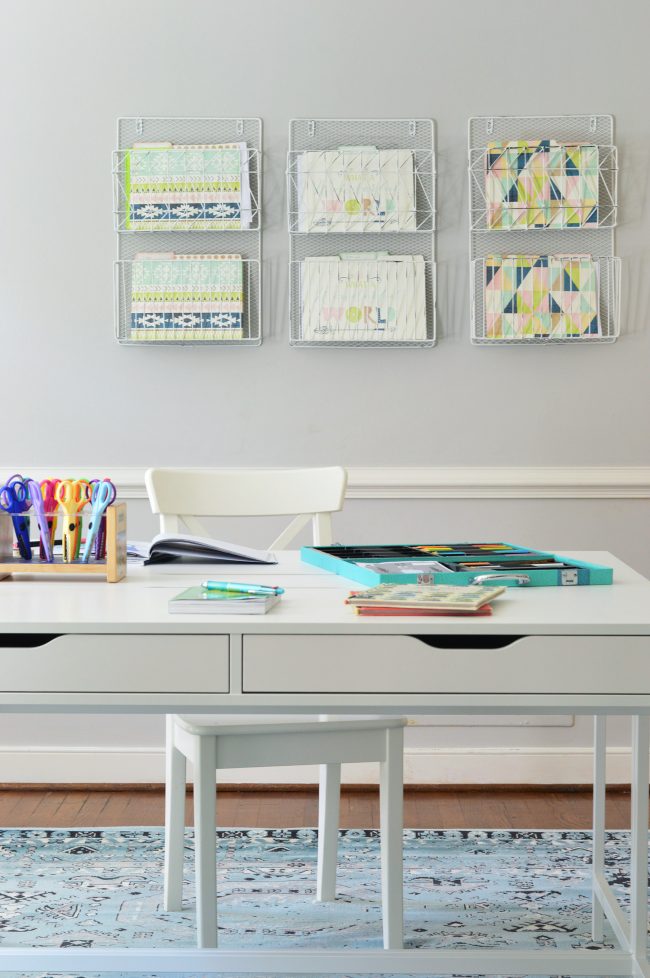
For example, in that same homework room that I showed you a few photos back, we has hung these wall-mounted organizers to store fliers and paperwork from school/camp/etc. They were super functional for their family, and got lots of use… but when it was staging time, well, that’s a different story.
This is that room staged to sell. The hanging file baskets bumped out a few inches from the wall, which meant that people walking by them might feel like the room was more cramped than it really was. Removing them and patching the holes took just a few minutes, and although this wall was left bare, there’s a large bookcase, some other art, and even a spiral staircase in other areas of this room – so it certainly wasn’t lacking interest. Bare is a-ok, especially if there’s something interesting to glance at nearby (and especially if the alternative is something that makes the room feel smaller or more cluttered).
DON’T REMOVE ALL PERSONAL ITEMS
On the subject of removing those framed photos, some stagers and realtors say that no family photos are allowed at all if you want to sell your house because it takes people “out of the fantasy that it could be their home.” I don’t fully buy into that. We didn’t remove family photos when selling our own homes, and I’ve yet to strip them completely out of any of my staging projects either. I’d argue that most brains can picture their family photo there in that spot instead of yours – just as they can picture their bed in the bedroom instead of yours – or their couch in the living room instead of yours. But I’d caution you about using too many family photos everywhere just because walls generally need to breathe to feel more open and less crowded – plus too much of anything can be overkill, so just use moderation and they’re probably fine.
What I’m getting to is this: I’m just as likely to remove a ton of frames with non-family photos or art as I am to remove actual family photos (especially clusters of smaller ones) because I’m generally just into decluttering walls, floors, and surfaces. So what’s in the frames rarely changes things for me – I just want the walls to feel open and expansive so the room doesn’t feel choppy and interrupted. You know, so things like the crown molding, the windows, a nice wide doorway, or the pristine floors will get noticed instead.
ACCESSORIZE WITH CAUTION
I feel like I’ve talked so much about taking stuff out that you’re wondering what the heck I leave in! Once spaces have been simplified (which means that I leave out just a few simple items like lamps, pretty storage baskets or boxes, lovely glassware, pretty stacks of books, etc), I often add a few additional accents and accessories to further neutralize or simply things. For example, switching out an old green plastic bottle of soap by the sink for a pretty white ceramic soap pump. Or putting some wooden spoons in a white ceramic utensil holder next to the stove instead of a ton of mixed and matched silicone baking spoons in a distractingly bold patterned jug.
At the bottom of this post I’ll round up some of my favorite staging-friendly items, but my general rule is that for places where you might expect to find decorative objects (mantels, bookshelves, entry tables, even countertops) DON’T OVERDO IT. When I staged the living room below I kept each shelf to just one or two items. It looks full, but not overwhelmed.
I have toiled over the arrangement of tables and mantles plenty in my own home (“mantlescape” is definitely in my vocabulary), but when I’m staging I don’t obsess over filling each side of a mantel with a perfectly layered arrangement. One vase + free greenery from the yard = light and lovely. I have yet to buy flowers for a house I have staged thanks to free greenery that still feels fresh and welcoming. Free = the staging jackpot. Especially when it’s this simple to execute.
Let’s go back to this bathroom for one more second. After I decluttered/cleared all the surfaces and pulled the bath mat out, what did I add back in? Just one small bud vase with free clippings from the yard. That’s it. Sensing a pattern? Free greenery adds such a nice pop of freshness to a room, especially once it has cleared off counters.
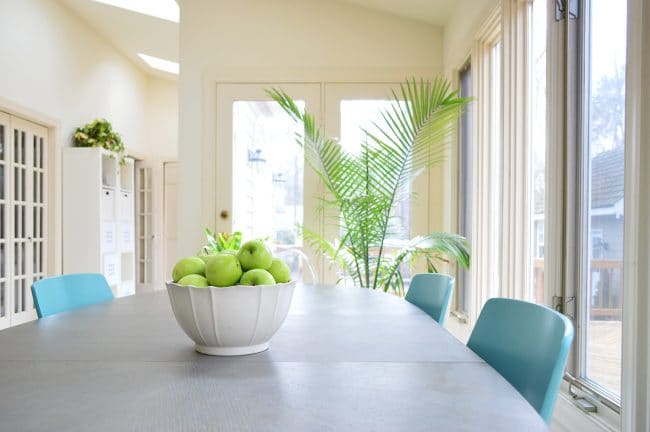
My favorite formula for dining tables and kitchen tables is, say it with me, a bowl of fruit. It’s so easy to bring a nice simple bowl (or find one in the house!) and fill it with fresh apples, bananas, clementines, anything! I have even invested in a bag of faux green apples that I bring to every job because they’ll never die and in a pinch I can use those. No need to break out the perfect place settings or candelabras – they’d just add clutter to the listing photos and distract from the actual room itself. This ain’t no dinner party. It’s a house-selling party and hopefully you’re invited.
STAGING A KITCHEN
Ok, now let’s go room-by-room, starting with the one that is often the make or break space for a potential buyer. Here is a before photo of a kitchen I staged. Just stare at this photo for a second and see what you notice before scrolling down. How much of the kitchen are you actually noticing and how much of the stuff in the kitchen are you registering instead of the kitchen itself?
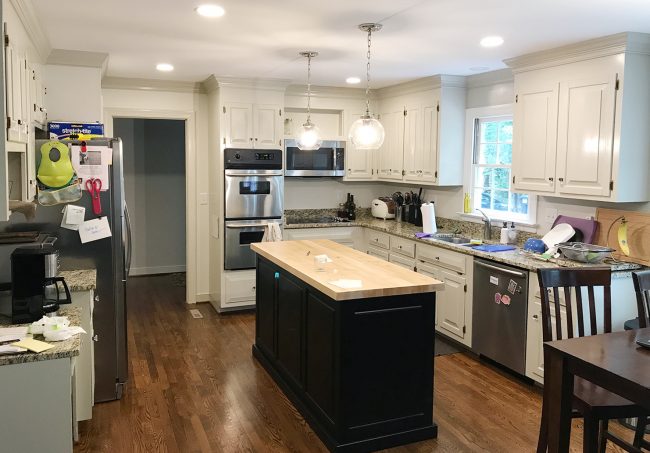
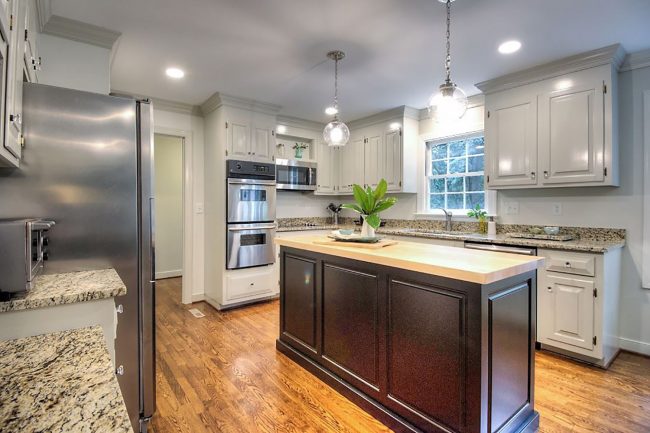
Here’s the room after I staged it, as it looked in the professional listing photo. The first photo was just a phone pic, and this one was taken by the professional photographer, which explains some of the slight differences in the cabinet and island color. But NOTHING was majorly changed in this room.
Here’s what I did do:
- Removed almost everything from the countertops, except for a few anchor pieces
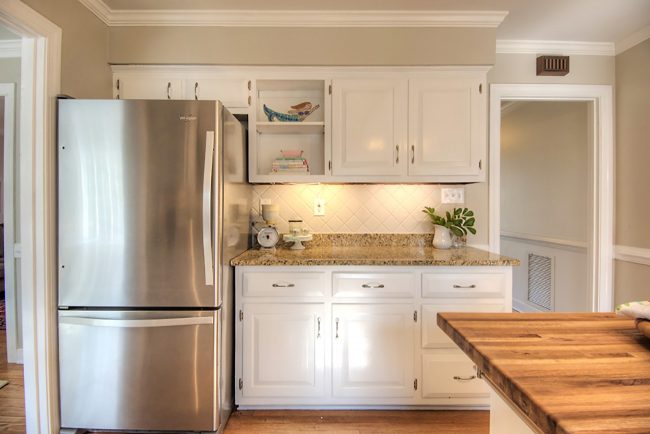
- Removed everything on the side and top of the fridge
- Added a white soap pump and a white pitcher with free yard cuttings
- Put a few decorative objects on the shelf above the microwave
Simplifying this kitchen helped people SEE the kitchen itself. Suddenly you notice the nice stainless double oven, the side of the fridge looks clean and pristine, even the pendant lights seem to get their “due” instead of blending in with a ton of other small things in the room. And except for the soap pump and the pitcher, every single item I used to stage this room was already there. So again, I generally find that editing is a lot more important than buying/adding.
Here’s a kitchen that took a bit more work to get ready to sell. The homeowners had been planning to update the room eventually, but a sudden job change forced them to move and I highly encouraged them to make painting the room a priority (they’re very handy and were willing to take on the task). Below is the before photo from the previous seller’s listing. Stare at this kitchen for a second. Really take it in. That is what they started with. Then scroll down to the after below.
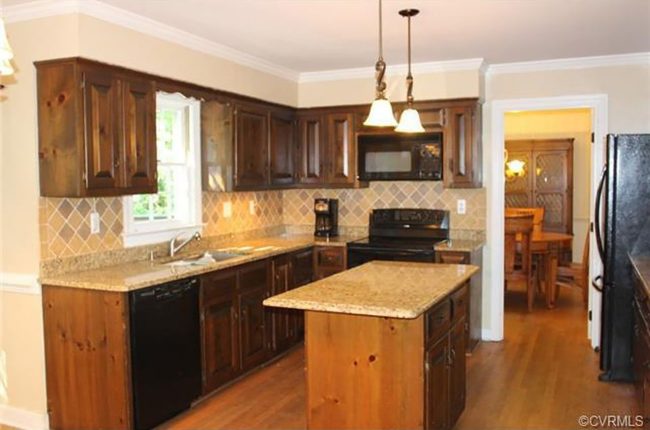
Yup, this is the same room. Some of the changes had already been made before I came to help (they had updated their appliances to stainless, swapped out the island counter for Ikea butcher block, and installed simpler pendant lights). So the only thing they did at my recommendation was paint those cabinets… and get this, they even PAINTED THE BACKSPLASH!
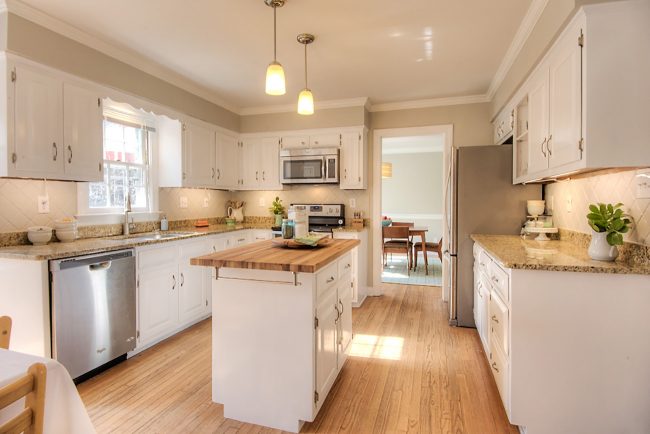
The backplash was porous travertine tile, which actually takes paint amazingly well. Soaks it up just like brick, which we have been painting with success for over a decade (any unsealed tile is typically great for paint – it’s the sealed ceramic and shiny porcelain stuff that might chip or flake off). So yes, if you have unsealed travertine tile or any other porous stone that you hate, it might actually work to paint it. It definitely helped to make this kitchen feel a lot fresher and larger.
Beyond those bigger paint-related updates, I did the same editing and accessorizing that I always do in a kitchen that I’m staging. I didn’t grab a before photo so you’ll just have to imagine this kitchen looking lived in. You know, the same paper-cluttered side of the fridge and overworked countertops that most of us have going on at home – especially in those busier seasons of life. But when you’re staging a house, you just have to stash that stuff. And it’s amazing how simplifying the space can make it feel so shiny and new and buyer-ready. Oh and there’s my trusty white pitcher with free clippings from outside. Let’s call him Old Faithful.
STAGING A LIVING ROOM
This first living room is from the same house as the painted kitchen. Again, the homeowner was willing to do some painting, which was a very good thing because the blue walls were overpowering the space and distracting people from everything else that it had going for it. And an abundance of furniture was making the room feel more cramped, even though it’s a generous size.
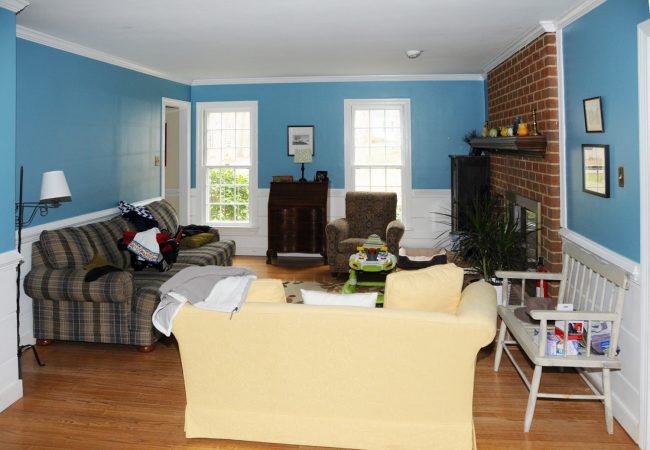
Here’s the room after the homeowner painted the walls & the fireplace, and I came back in to stage it. SUCH A DIFFERENCE, right? Now scroll back up. What do you notice about the two photos? Which room would you say looks bigger and lighter and more welcoming? I’d argue that this room looks nearly twice as deep as the one above – and they’re the exact same room.
Here’s what I did to update this space after the walls got a more neutral paint color and the fireplace went white to match the wainscoting:
- Reduced the amount of furniture and swapped in lighter furnishings they had in another room
- Added a large rug from another room to show off the size of this space
- Decluttered and brought in simple accessories
Not a single item of furniture (or the rug) was purchased for this. They had more furniture than they needed in many of their rooms – including another family/TV room and a bonus room upstairs. So it was just about removing the extra stuff (a lot of the larger darker furnishings went into the attic) and spreading out the lighter stuff for a more simplified and less full-feeling arrangement in each of those areas.
This is also an example of how staging differs from real life living. In real life, someone might want a sectional or another chair in this room (and definitely a coffee table!), but for staging, lightness and openness is a good thing. So just because you can seat 10 people in your living room now (and you love that fact!) doesn’t mean you have to keep all that seating when you stage your house to sell. Especially if moving a few items out can make a room feel twice as big. A larger feeling room will be more attractive to a potential buyer than a room that’s chock full of seating and furniture to the point that it feels cramped every. single. time.
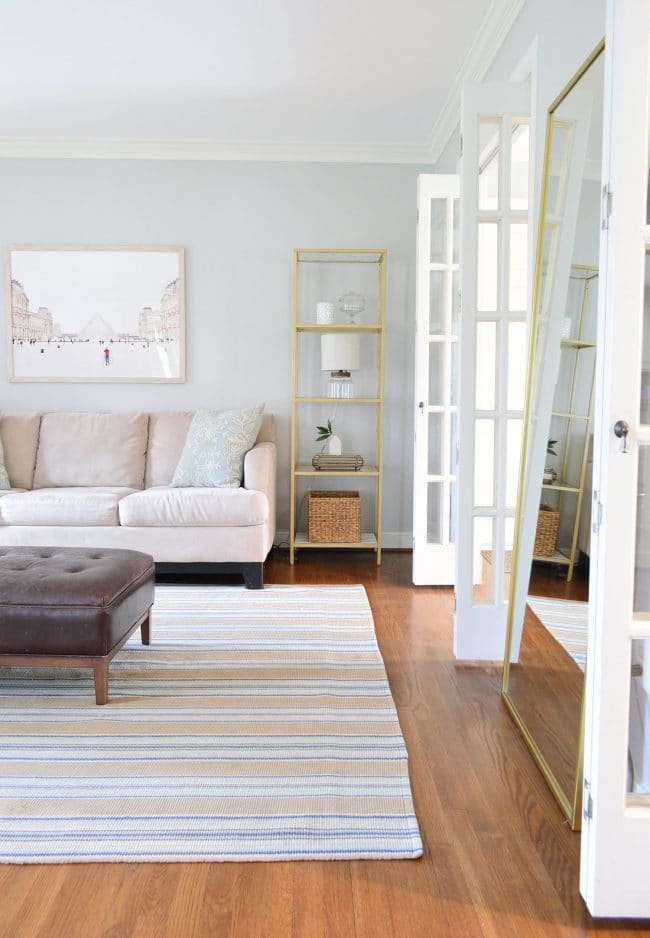
Speaking of that difference, here’s a living room I photographed right after I designed/decorated it and then later after I staged it to sell. It’s my friend’s living room that started off like this:
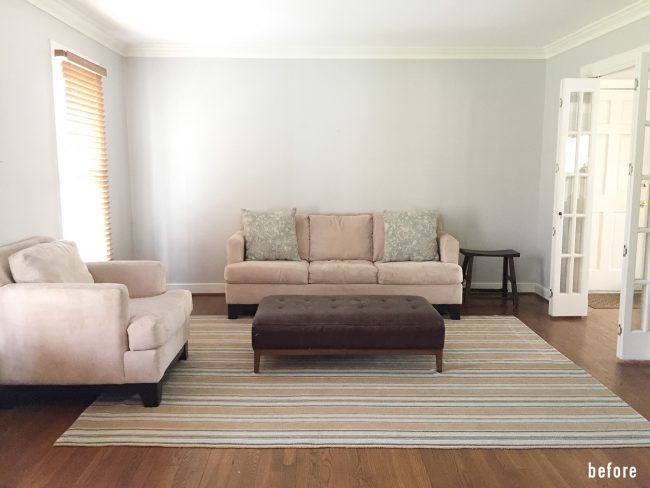
Last year I helped her update the space using a ton of stuff she already had, plus a few inexpensive new items (from places like Ikea and Amazon – you can read more about it here). So the picture below is when we were aiming to create a polished and accessorized living room that felt layered and a lot more interesting than the bland before.
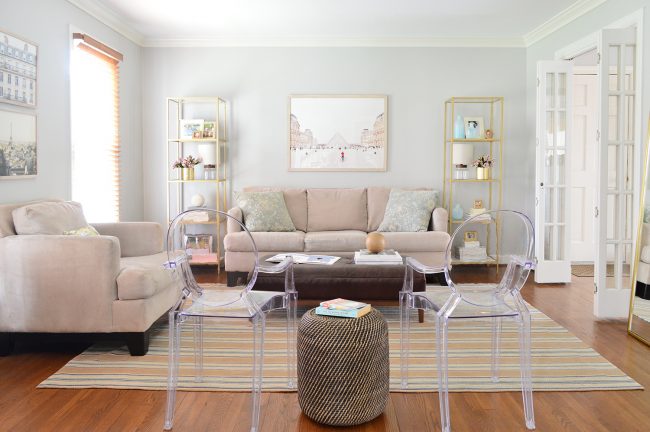
You might think you’d want your living room to look all layered and accessorized like a magazine spread in your listing photos and showings. But I’d argue that you shouldn’t go that far. You run the risk of people noticing alllllll the details and accessories and textures that you brought into the room instead of noticing the true bones of the actual room. Again, which is what they should be noticing! This is that same room staged to sell:
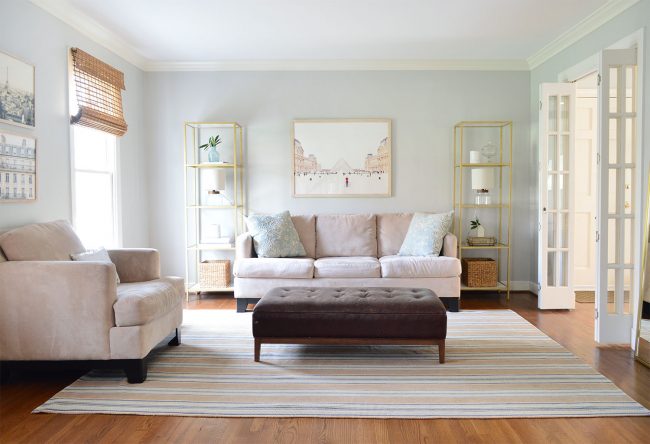
It’s not a major difference, but I wanted the room to feel more open, so here’s what I did:
- Removed the seating area in the foreground so the eye continues further into the room
- Cleared the ottoman off completely
- Reduced the number of items on the shelves by about half
It only took about ten minutes (most of which was spent taking the ghost chairs to the attic) but it really helps you notice the true stars of the room: those gorgeous glass doors and the extra tall light-filled windows.
STAGING A DINING AREA
Here’s a great example of how a room itself isn’t actually dated… but the furniture and the curtains are making it feel that way. The bones of this room are actually great: crown molding, chair rail, nice big window, and hardwood floors. But do you notice that here? Nope. That dark looming (and giant!) china cabinet + those ornate window treatments are making this room feel old fashioned and a lot less fresh than it could be.
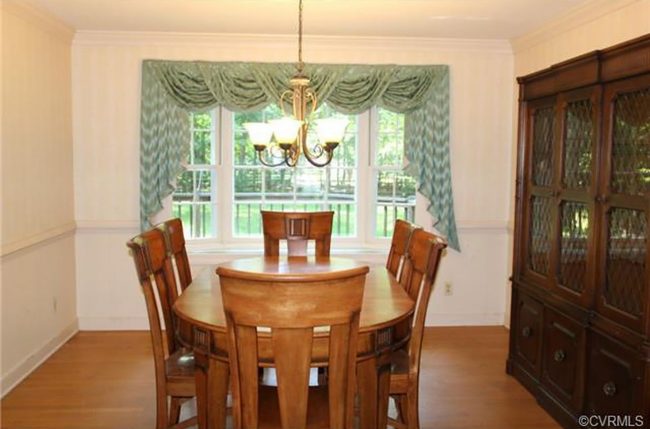
These homeowners had already repainted, removed the curtains, and swapped out the chandelier for an inexpensive pendant before calling me in, so the room had come a long way already. And the remaining finishing touches took it even further:
- Bringing in a secondhand dining table with chairs (scored for $72!)
- Moving a rug in from another room
- Accessorizing with – you guessed it – a bowl of fruit
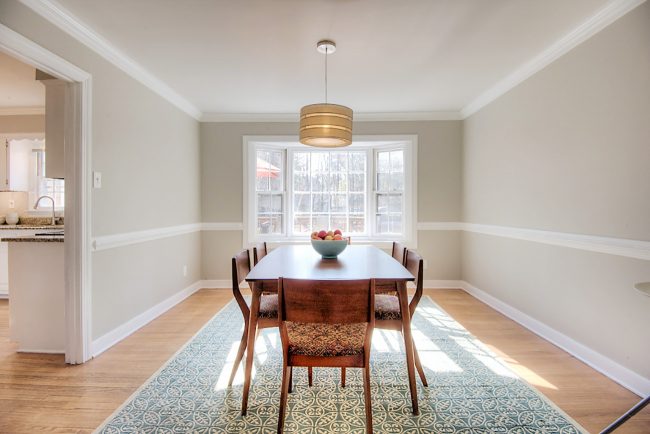
Would I call this room “finished” if I were decorating it for a magazine spread? Nope, I’d probably add curtains, art, a buffet, etc – but when it comes to staging, this room feels spacious, full of light, and you finally notice things like the crown molding and that nice big window. Mission accomplished.
ITEMS TO BUY WHEN STAGING A HOME
I hope I’ve made my point in this post that you may not need to buy a single thing when staging a home (whether you’re selling it, or just simplifying it for a nice airy feeling that you can enjoy every day while living there). Decluttering and cutting free things from the yard can make an enormous difference alone. But if you feel like your efforts are falling short, or you’re looking to stockpile a few items for your own staging business (or just want some pretty objects for your house that are flexible crowd-pleasers), here are some trusty things I have in my staging arsenal:

- Fluffly white bath towels (they always bring that spa feeling)
- Extra-long white shower curtain (bright or patterned curtains can make a bath feel busy)
- White duvet cover (to neutralize busy/bold bedding, which can be more polarizing)
- White utensil holder for next to the stove (keep counters mostly clear otherwise)
- A few solid colored accent pillows (to add color to a sofa, loveseat, bed, etc)
- Various small bud vases for yard clippings (I always have at least 3 on hand)
- One large accent vase (this alone on top of a dresser is all you need)
- A plain white pitcher (can also double as a vase or a utensil holder)
- Neutral affordable rug (it’s available in lots of sizes and an 8 x 10 is $200!)
- Large framed art (to break up any big empty walls)
- Smaller framed art (for weird dead spaces – like the spot above the toilet)
- White soap pump (to simplify a sink that’s cluttered with plastic pumps)
Anyways, I truly am a nerd for house staging (hence just blurting out over 4,800 words on the subject), and my hope is that even if you’re not selling your house, maybe something in here sparked an idea for making your home feel a little more peaceful. Or maybe it just made you hungry for a bowl full of apples. That’s not a bad thing either ;)


No comments:
Post a Comment